Wednesday, February 29, 2012

Black and White Challenge

I will be participating in a Black & White Challenge that was created by two fellow bloggers, Dolores of Colorful Bottle and Mateja of Purple Glitters. Dolores sent me a sweet invitation to join and I just couldn't resist. There are 10 challenges which are described in the image below and a challenge manicure is posted every 3 days starting March 1st.


I'm really excited to start the challenge tomorrow and see who else is participating. If this looks interesting to you, don't hesitate to join! Check out Colorful Bottle and Purple Glitters for more information.

Thanks for looking!
Anutka :)

Tuesday, February 28, 2012

Tutorial Tuesday: Freehand Flowers

When I posted this manicure earlier this month, I received lots sweet comments along with a few requests for a tutorial. Before starting the tutorial, I must preface it by saying that I freehanded each flower using a tiny brush and it took much longer than it should have. Since then I realized there is a much easier way to get the same result, so this is how I would make this manicure if I were to do it again...


Monday, February 27, 2012

Barielle Unraveled Rust Gets Rusty...

The last polish from the Barielle Argyle in Style collection that I played with was Unraveled Rust. I loved the rich dark chocolate brown, but it really didn't make think of rust, so I decided to change that. After googing images of rust, I found one that I loved and used it as my inspiration. To get the look I used a combination of sponging, dry brush, and even crackle. It seemed as though I threw every polish I own into the mix. Probably couldn't do it again even if I tried. In the process, I discovered that I don't have quite the right turquoise blue to really make it pop, however I still love how it turned out....


This is the inspiration image, which I found here. I love the colors in this. Really wish I had the right blue to make it stand out. Guess there is always room on the wish list for more colors...


Polishes Used:
Maybelline - Summer Spice
LA Colors - Current

Essie - Braziliant
Color Club - Almost Famous

Barielle - Unraveled Rust 

China Glase Crackle - Crushed Candy
LA Colors - Sea Siren

Avon - Gleaming Gold


I hope you like this manicure and I would love to know what you think of it!

Thanks for looking!
Anutka :)

Sunday, February 26, 2012

Sunday Stamping Challenge: 3 Colors

It is crazy how fast time flies, but it is once again time for another Sunday Stamping challenge in the Facebook group Adventures in Stamping. This week the challenge was to create a manicure using three colors. I toyed with the idea of layering stamped images. For example a full background stamp in one color and then a smaller stamp on top in another, but I digress...

I chose to do something I have been wanting to try for a while. This technique involves dragging multiple colors over the stamping image at once to allow them to mix directly on the stamping plate. It took a few tries to get a nice combination and figure out how to get the colors to mix nicely, but I love the result. I started out with two coats of Wet 'n Wild French White Creme. For the stamping I used two Color Club polishes, Cold Metal and Lumin-Icecent from the Foiled collection. I just love them for stamping. The image is from Red Angel plate RA-109


I hope you liked my take on today's challenge. If you are interested in stamping, I encourage you to join the group Adventures in Stamping...

I'd love to know what you think of this. Have you tried this technique before?

Thanks for looking!
Anutka :)

Saturday, February 25, 2012

Barielle Wool You Marry Me? Gets Stamped

In keeping with the theme of manicures inspired by the color name, Barielle Wool You Marry Me? provided a few options. Since a marriage manicure didn't seem appealing, I focused on the wool part of the name. Wool made me think of sheep and sheep made think of little curls. To be fair, I must confess that I first tried drawing little sheep and failed miserably (my bf will attest to that), so I settled on just the curls. The curls were stamped using Sally Hansen Celeb City and Bundle Monster plate BM-201. The tips were added using tape and Celeb City. I think the silver really brought out the red in Wool You Marry Me?...


I would love to know what you thoughts are on this...

Thanks for looking!
Anutka :)

Friday, February 24, 2012

Barielle Tight Knit with Pure Ice Stamping

Barielle Tight Knit inspired me with the name, so I had to find a stamping image to match. The closest that I have is a lacy pattern from the Bundle Monster plate BM-210. It reminds me of a cable knit sweater. I stamped the pattern using a Pure Ice gold 313CP to create the subtle print. I think the gold perfectly compliments this shade of brown. It was a bit difficult to get the pattern centered on my nail, but I still like the result. Just wish someone would invent a clear stamper so I can see where the heck the pattern is going...


I'd love to know what you think of this!

Thanks for looking!
Anutka :)

Thursday, February 23, 2012

Barielle Cashmere or Loose Me with Essie Braziliant in Argyle

I mentioned yesterday that in addition to swatching the Barielle Style in Argyle collection I also messed around with some nail art that I will show you over the next few days. For this manicure, I was inspired by the collection's name and decided to try the argyle pattern on my nails.

I started out with Barielle Cashmere or Loose Me which I paired up with Essie Braziliant in an argyle pattern. Green lines were added using acrylic paint. It looked a bit bland so I topped the whole thing off with Essie Pure Pearlfection. I can't quite decide which version I like best, so I will show you both and hopefully you can tell me what you think. This is topped with the luxeffects polish...

UPDATE: Tutorial for this manicure available here.


This is what it looked like before I added Essie Pure Pearlfection...


I would love to know what you think. Which version do you like better (if at all)...

Thanks for looking!
Anutka :)

Wednesday, February 22, 2012

Barielle Browns from the Argyle in Style Collection

I realized that I own five out of six of the brown polishes from the Barielle Style in Argyle collection released in Fall 2010. I'm missing Aura Angora which I didn't buy when it was still in stores and now I regret it. The one thing that always baffles me is that they look the same in the bottle, so it was time to swatch them so I could tell them apart...


Tuesday, February 21, 2012

Tutorial Tuesday: Clean Up...

I have been debating whether I should make a clean up tutorial or not for a while now since there are other tutorials out there that describe this method. In fact, it was not too long ago that I was learning from such tutorials. Recently I received a sweet email request from a reader asking to see how I clean up my manicures and I could not resist. Hopefully this will be useful and show a few tricks I have picked up along the way.


Sunday, February 19, 2012

Sinful Colors Easy Going and Sunday Stamping Challenge

It is time again for the weekly Sunday Stamping Challenge in the Facebook group Adventures in Stamping. I have been feeling sick the past few days, barely motivating myself enough to go to work and I really didn't think I would be participating in this week's challenge. I woke up (just a few hours ago) feeling a little bit better and decided to attempt something for the challenge before I have to leave for work. This week the challenge was to make a manicure using a stamping plate ending in 3. I chose one of the generic plates I got from Ebay numbered M63.

I started out with Sinful Colors Easy Going. The name seems to really match my mood at the moment. I stamped using Borghese Mezzanotte Blue and a flower image from the plate M63. Mezzanotte Blue is a very pigmented dark navy blue. In a full manicure it is so dark that most of the time it looks black, but it was perfect for stamping. To the center of the flower I added a small (2mm) pink rhinestone.


Sinful Colors Easy Going is a very light pink cream. It is almost white with just a hint of pink. The formula on this was great, opaque in two coats. The brush, however, was very stiff and left scratch marks in the polish. I have a feeling this is just a problem with the bottle that I have, since I don't usually have problems with Sinful Colors brushes. I applied three coats to even everything out and that worked just fine. This is with a top coat...


Swatch Details
Brand: Sinful Colors
Collection: Main Line
Color Name/Number: Easy Going, 300
Number of coats: 3
Top Coat: Yes

Free of Formaldehyde, Toluene, Dibutyl Phthalate (DBP)

I hope you like my last minute attempt at the stamping challenge. I'd love to know what you think!


Thanks for looking!
Anutka :)

Saturday, February 18, 2012

Guest Post on ChitChatNails

Today my water marble manicure is a featured guest post for Marta of ChitChatNails, while she is away in Poland. Head on over to ChitChatNails to check out the full details...


Thanks for looking!
Anutka :)

Friday, February 17, 2012

Acetone with Glycerin Remover Update

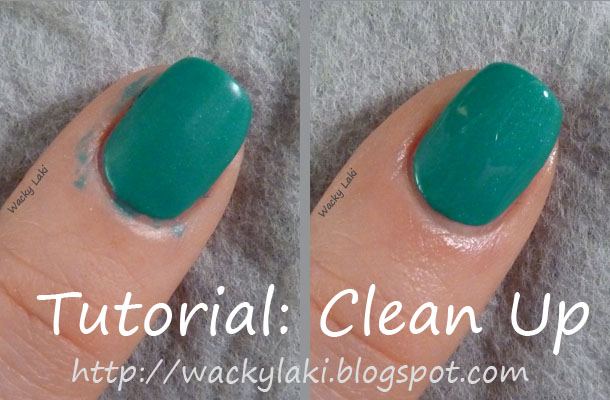
I wanted to make a followup post to the acetone with glycerin mixture that I posted about a while ago. A few people who tried it, commented that it was a bit too oily and while the oiliness didn't bother me too much, there is always room to improve. When I ran out, I decided to slightly rework the formula. In addition, this time around I had the infamous Zoya Remove+ to compare to. Looking at the Remove+ formula which contains: Acetone, Water, Glycerine, Fragrance, and color I knew the ingredients are right and it was just a matter of proportions.

For my second attempt, I started out with acetone and added glycerin in little by little until I could see a separation between the two liquids forming at the bottom. Then I added bottled water a little bit at a time until there was no longer a separation. This resulted in a much smaller glycerin to acetone ratio.

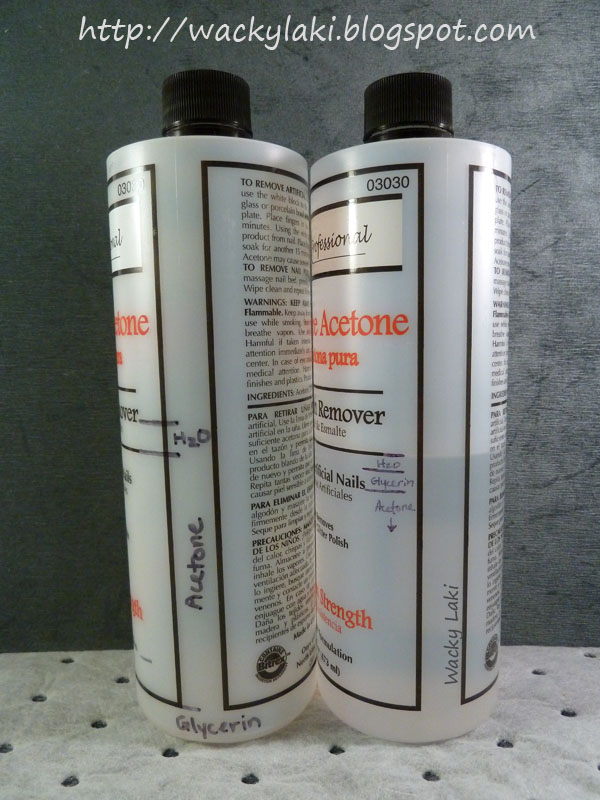
The new mixture is a lot less oily, while still very moisturizing and not as harsh as pure acetone. It feels a lot more like Remove+, but without the strong fragrance which gives me a headache. Below is the old (empty) bottle on the left and the new bottle on the right.


Here is a quick tutorial on how you can make this yourself...
1. Start with any amount of acetone you want
2. Add glycerin in small amounts and shake/mix to incorporate. Repeat this until the glycerin no longer completely dissolves in the acetone (see last photo)
3. Using distilled, purified, or bottled water add a little bit at a time and shake to mix. Repeat this until you no longer see a separation between acetone and glycerin. Water helps the glycerin dissolve in the acetone completely.
4. All done, time to test it out! :)


Here is what it should look like at step 2 when the glycerin and acetone no longer mix. You can see the separation of the two in the corner of the bottle. It is very slight when adding glycerin in small amounts so just keep checking the bottom...


That's all there is to it! No measuring required and it is really simple once you try...

I would love to know if you try this and what you think about it!

For more info on the chemistry behind this take a look at this blog post from loodie loodie loodie who my inspiration came from...


Thanks for looking!
Anutka :)

Thursday, February 16, 2012

Borghese Sonata Berry C with Pure Ice Oh Baby!

I'm not feeling well today, so I will keep it short and show you a manicure from a while back. This is Borghese Sonata Berry C topped with Pure Ice Oh Baby!. Oh Baby! is a sheer base with a color shifting shimmer. The shimmer changes from green to blue to purple/magenta depending on the angle that it is viewed at. It is a fun and quick way to spice up a solid color. I'm loving all the "effect" polishes lately...


In it's own Borghese Sonata Berry C is a deep berry red polish with a jelly finish. I used three coats to get nice even coverage. It is not original in my collection, but I do tend to like these colors so I end up with lots of them. Application was good, I love the wide brush in these polishes. This is with a top coat...


Swatch Details
Brand: Borghese
Collection: main line
Color Name/Number: Sonata Berry C, B255
Number of coats: 3
Top Coat: Yes

Free of Formaldehyde, Toluene, Dibutyl Phthalate (DBP)

What do you think of the "effect" polishes that are so popular lately?

Thanks for looking!
Anutka :)

Wednesday, February 15, 2012

Sally Hansen Salon Effects Bling It On for Valentines Day

I wanted to show you the manicure I wore on Valentines Day. To be honest my boyfriend and I have never been big on celebrating the holiday and in the 12 years we've been together, we have never actually gone out on Valentines Day. Although he does usually get me flowers and there was a gorgeous pink orchid waiting for me when I got home from work. With that in mind, I really wasn't planning on doing a themed manicure, but about an hour before having to leave for work, inspirations struck and I had to go with it.

For the manicure I used Sally Hansen Salon Effects in Bling It On which I got from Carolina's giveaway. The Bling It On nail polish strips are composed of sparkly pink and yellow glitter. As always the photos don't capture just how much "bling" these nail polish strips have. The best part of all is that they are really smooth. I've never had such a smooth glitter manicure before. Application was really easy and once again I'm very impressed with these.

For the heart accent I used a heart shaped punch that I got from Michael's for $1 a long, long time ago. I applied the heart cutout using the same technique as the nail polish strips...


For the thumb I applied the polish strip with the heart cut out rather than applying the heart. Interestingly the polish strips are a bit sheer, which is not noticeable when placed over an unpainted nail, but it did darken the color when placed over black polish...


Here is a bit of the aftermath of punching leftover nail strips. Sadly the nail polish strips dry out and are not useable once they are out of package for a while, but they were fun to punch!


The manicure was quite fun and I got lots of comments at work. One lady even asked to touch my nails after I told her they were the nail polish strips. That's definitely a 1st for me...

I should mention that removal of these was a pain in the behind, the same as any dense glitter polish. I guess that's what I get for being lazy and not using the foil method.

I'd love to know what you think! Have you tried anything fun with these strips before?

Thanks for looking!
Anutka :)

Tuesday, February 14, 2012

Zoya Feel Collection Recap

I thought it would be nice to do a recap of the Zoya Feel collection and the nail art that went with it. On individual swatches a few of the colors look similar so it is good to see them all side by side for comparison (at least I think so).


The collection delivers on it's promise of full coverage neutrals. Each one only took two coats to provide even color and completely cover the nail line. Application was great and consistent on all of them. I was really impressed with the color range from baby blue down to the tan, especially considering just how similar they look in the bottles. My boyfriend was convinced it was six bottles of the same color/shade.

You can click on any of the photos below to be taken to the original post for the full details...

Zoya Kristen - a periwinkle blue cream


Zoya Carey - a dove gray with a hint of lavender


Zoya Megan - a pale lavender with a hit of blue


Zoya Kendal - a soft lavender cream


Zoya Kennedy - a beige cream


Zoya Avery - a tan cream

What did you think of this collection?
Which are you favorites?

Thanks for looking!
Anutka :)
Related Posts Plugin for WordPress, Blogger...